Beading basics for laminate flooring
What is beading and why it matters for laminate floor installation
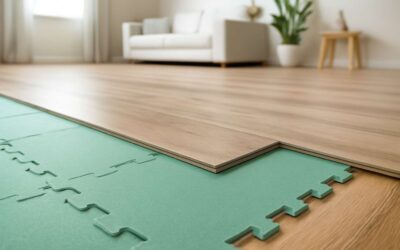
Beading to laminate floor crafts the room’s quiet boundary, catching the eye with subtle restraint. In a climate where boards expand and contract with the seasons, the bead becomes a hinge for movement and light. From my years of installations, it’s a small detail I’ve learned to value—one that makes a big impression, especially in bright South African mornings.
What is beading? It’s a slim strip of timber, PVC, or metal that sits along the room’s edge to cover expansion gaps and provide a neat transition to thresholds. Beading to laminate floor matters because without it, edges can fray, moisture sneaks in, and the overall finish looks unfinished despite your best efforts.
- Wood beading for a warm, natural look
- PVC beading for moisture resistance and easy maintenance
- Metal or Scotia beading for a modern, durable edge
Choosing the right bead means considering room traffic, moisture, and the substrate beneath your laminate. The result is a seamless tableau where every seam breathes, and the floor remains stable longer—an understated but essential cornerstone of professional beadwork in laminate floor installations.
Beading to laminate floor overview: purpose, benefits, and finishes
Across South Africa, the edge detail sets the room’s tone. Beading basics for laminate flooring keep expansion gaps tidy, catch light, and prevent edge wear. The right bead acts as a hinge for the seasonal shifts of humidity and temperature, letting the floor breathe while maintaining a clean silhouette. Beading to laminate floor is a quiet, high-impact finish that elevates even a simple room!
Finishes come in three common forms—choose by look and environment. Beading to laminate floor pairs with each style to protect edges and create a clean line:
- Wood beading for warmth and a natural look
- PVC beading for moisture resistance and easy maintenance
- Metal or Scotia beading for a modern, durable edge
Choosing the right bead depends on traffic, moisture, and substrate. The result is a seamless tableau where every seam breathes and the floor stays stable longer, a cornerstone of beadwork in laminate installations. Beading to laminate floor ties the room together with quiet confidence.
Common materials used in laminate floor beading and their pros and cons
Beading basics for laminate flooring hinge on edge details that balance movement and aesthetics. The technique of beading to laminate floor relies on three materials—wood, PVC, and metal edge beads—each bringing a distinct character. Wood beading adds warmth, but its edges can bow with humidity. PVC beading resists moisture and cleans easily, yet may feel less premium. Metal Scotia offers a clean, durable edge, though it can show scratches in high-traffic zones.
Across South Africa, moisture and foot traffic shape the choice. Here’s a quick snapshot of common materials:
- Wood: Pros warm aesthetic; Cons humidity sensitivity; Best in dry spaces.
- PVC: Pros moisture resistance, easy maintenance; Cons less premium feel; Suitable for moist or utilitarian areas.
- Metal/Scotia: Pros clean lines, durability; Cons potential dents and higher cost; Works well in modern interiors.
Beading quality indicators for laminate flooring
Edge perfection defines the lasting look of laminate floors. Beading basics for laminate flooring hinge on a clean profile, precise height, and a seamless transition beside walls and thresholds. For pros, beading to laminate floor starts with profile selection, groove tolerance, and finish to remain stable under humidity and foot traffic.
Quality indicators that separate good from great beading include the following:
- Consistent edge height and smooth profile
- Tight, flush joins with adjacent boards
- Minimal gaps and no burrs along the bead
- Secure attachment that resists lifting in humid climates
In South Africa’s varied climates, the right beading choice balances aesthetics and longevity, keeping floors looking sharp while withstanding daily use.
Types of beading for laminate floor transitions
Choosing straight beading vs decorative beads for laminate floors
A sharp room impression hinges on one detail—beading to laminate floor transitions. In many South African homes, the right bead defines whether the floor reads as seamless or styled. Two main paths exist: straight beading for a clean, uninterrupted line, and decorative beads that inject personality while masking minor alignment quirks.
Choosing straight beading vs decorative beads depends on function and mood. Straight beading delivers a quiet, contemporary edge and quicker installation; decorative beads create focal points and can echo cabinetry or trim. For a subtle, textile-like finish, stick to straight; for a designer touch, decorate with beads that complement the laminate.
- Straight beading: clean line, fast install, low maintenance
- Decorative beads: adds character, demands precise fitting and sealing
In short, the beading to laminate floor choice shapes the room’s finish and should harmonize with climate, subfloor, and laminate grade across South Africa.
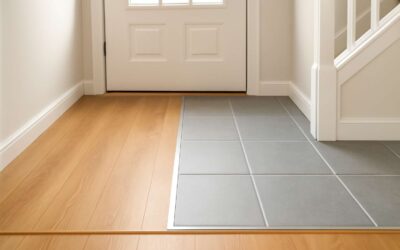
Beads for door thresholds and transitions on laminate flooring
In South African homes, the bead at a doorway does more than hide a seam—it frames the room’s flow. Beads for door thresholds and transitions on laminate flooring can subtly steer the eye from room to room. The right profile blends with light, furniture, and climate, turning a simple seam into a confident edge. Beading to laminate floor is where function slips into design.
- Straight bead profiles for a clean, flush transition that reads as a single plane
- Decorative beads that introduce a deliberate design moment at the threshold
- Threshold and reducer profiles that manage height differences and seal gaps between rooms
Beyond aesthetics, the choice affects installation pace and long-term performance in varying South African humidity. The right bead locks in comfort, resists movement, and works harmoniously with different laminate grades and subfloors.
Edge beading vs floor-surface beading: compatibility with laminate planks
Edge transitions don’t just hide seams; they frame a room’s momentum. In South African homes, the beading to laminate floor choice isn’t cosmetic—it’s psychological, guiding the eye as you move. Two main forms shape this: edge beads and floor-surface beads, each whispering a different note as you cross a threshold.
- Edge beads sit at the seam, flush with the laminate face, creating a clean, uninterrupted plane.
- Floor-surface beads ride on top, adding a subtle accent while tolerating slight height variances between rooms.
Choosing between them hinges on compatibility with laminate planks—thickness, locking system, and wear layer all play a part. The right bead steadies traffic; I’ve seen rooms breathe easier when the transition feels intentional, harmonising with SA humidity and turning a simple edge into a confident one.
Profile options: square edge, bevel, micro-bead
Edge transitions are the punctuation marks of a room—subtle, decisive, essential in SA homes where humidity nudges boards. Beading to laminate floor isn’t mere décor; it’s a momentum statement as you cross a threshold. An edge bead can vanish into the line of the planks, or whisper a gentle separation that keeps sightlines calm as the air swells.
Profile options add personality without shouting! Here are common shapes used in laminate transitions:
- Square edge: flush, minimalist, seamless along the laminate face.
- Bevel: a deliberate micro-angle that broadens the floor’s footprint and hides minor height variations.
- Micro-bead: a tiny raised bead that acts like a whispering accent, ideal where precision matters.
Choosing among them hinges on plank thickness and locking systems, and how each interacts with traffic and wear. In South Africa, houses vary in humidity and use, and the right profile steadies movement while keeping transitions intentional rather than accidental.
Installation techniques for beading to laminate floor
Preparation and measurement for beading along laminate joints
In South Africa’s sunlit workshops, a floor speaks in coordinates—the seam where craft meets possibility. A line drawn becomes a promise kept. “Measure twice, lay once,” a veteran murmurs; the bead, aligned with the laminate, turns a doorway into a rhythm you can walk with!
Preparation and measurement for beading along laminate joints demand care. For beading to laminate floor, lay out the plan so joints breathe, and check humidity, plank tolerance and room temperature to keep the line clean.
- Joint alignment across the room
- Humidity and temperature stability
- Expansion space at corners and thresholds
Installation techniques in laminate interiors lean on quiet contact and measured finesse, not haste. I speak in gentle terms about how the bead glances the edge, follows the grain, and disappears into the room’s light—a graceful whisper rather than a shout.
Tools and materials needed for beading installation
Installation techniques for beading to laminate floor in South Africa’s sunlit studios demand a quiet hand and a patient eye! The bead should kiss the edge, following the grain without crowding the seam, and settle into thresholds with a subtle, musical touch. I move with measured pauses, letting each tap—deliberate but light—tell the story of a room that refuses to rush. This is beading to laminate floor done with intention, not force.
Tools and materials you’ll rely on include the essentials:
- Tape measure and straight edge
- Utility knife or laminate scoring knife
- Beading setting tool or rubber mallet and tapping block
- Construction adhesive or pre-glued beads, as required
- Caulking gun and silicone sealant for expansion gaps
- Safety gear: eye protection and gloves
The result is a line that breathes with the room, a quiet agreement between craft and light—an invitation to walk the threshold with intention.
Step by step beading installation on laminate floors
Edge precision is the quiet signature of a room, and in South Africa’s sunlit studios the difference is felt at the threshold. Beading to laminate floor requires patience, rhythm, and a reverence for the grain. I approach this step-by-step with a calm, deliberate hand, turning a straight seam into a living line of light the eye chooses to linger on.
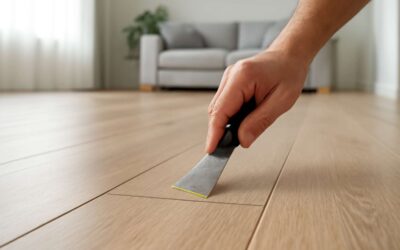
- Prepare the joint: cut the bead to length with a sharp utility knife, leaving a small expansion gap between plank and bead.
- Align the bead along the edge, following the laminate grain and avoiding crowding the seam for a natural fit.
- Seat the bead by tapping gently with a rubber mallet and tapping block until it sits flush and true.
- Finish with adhesive only where required or use pre-glued beads; apply a light silicone bead for expansion zones.
When the last bead is set, I wipe away any excess and, if needed, seal expansion gaps with a touch of silicone. I think of beading to laminate floor as a quiet art—an elegant threshold that carries the room’s light and memory with confidence.
Common installation mistakes and how to avoid them
Technique matters at the threshold. For edge finishing, planning shapes the outcome. A clean edge emerges from mindful alignment and a measured pace, not haste!
Common missteps—crowded seams, uneven seating, missing expansion gaps—reveal themselves in the room’s line. The solution is restraint: treat the joint as a living edge that breathes.
Adhesive choices influence the edge’s feel, especially where humidity shifts in SA homes. Some beads arrive pre-glued; others invite a flexible seal in expansion zones to accommodate movement.
Final appearance hinges on attention to detail: subtle gaps, flush seating, and a quiet seam that catches light without shouting; beading to laminate floor is a quiet art that anchors light and memory in a room.
Maintenance, care, and longevity of laminate floor beading
Cleaning tips for beading and laminate floors
Forty percent longer life—this is the quiet promise of diligent maintenance. In South Africa’s sunlit homes, dust and sunlight test every seam, yet thoughtful care can extend beauty for years. Gentle routines help preserve the look, feel, and the precise line between plank and bead.
For daily upkeep, rely on gentle approaches that respect the seal between plank and bead: light dusting with a soft brush, blotting spills promptly, and cleaners that suit the laminate’s finish.
Longevity follows from humidity control, thoughtful furniture handling, and periodic checks of edges and transitions, especially where beads anchor the planks. A calm, proactive approach keeps the floor feeling fresh through seasons of heat and rain in SA.
With mindful care, beading to laminate floor stays secure and handsome for years to come.
Repairing damaged beading on laminate floors
Forty percent longer life—this quiet promise haunts South African homes as we walk across beading to laminate floor. Dust and sunlight test every seam, yet careful care keeps luster intact for years, preserving the crisp line between plank and bead.
Daily upkeep follows a gentle rhythm that respects the seal.
- Light dusting with a soft brush to protect the beading to laminate floor junctions.
- Blot spills promptly to prevent moisture at edges.
- Choose cleaners designed for laminate finishes to shield bead.
Repairing damaged beading on laminate floors is best addressed early. Focus on edge and transition beads where wear shows first; in SA homes, small fixes today prevent larger rework tomorrow. Humidity control and mindful furniture handling sustain the seam’s integrity.
Preventative measures to extend beading lifespan
Forty percent longer life—that’s the quiet promise many South African homes hinge on as they walk across beading to laminate floor. The seam’s endurance murmurs through sunlit rooms, a vow that careful maintenance keeps lustre bright and transitions clean between plank and bead.
Preventative measures rest on a few pillars: humidity balance, edge protection, and finishes that honour the bead’s movement.
- Humidity balance across seasons
- Edge protection and careful furniture handling
- Finishes and cleaners designed for laminate beading
Longevity rewards quiet consistency. When the beading to laminate floor is treated as a living seam, it offers resilient charm that endures through daily use and changing light, a testament to discipline in design.
Seasonal and environmental considerations affecting beading
Forty percent longer life—quiet promise, loud in South African living rooms. The seam where beading to laminate floor meets planks speaks of resilience, a subtle vow that season after season care keeps its lustre.
Maintenance, care, and longevity of laminate floor beading hinge on seasonal and environmental considerations. Seasonal shifts in humidity, temperature swings, and sun exposure shape expansion and contraction, influencing how the bead holds colour and sheen.
- Seasonal humidity shifts and air flow in homes
- Sunlight through windows and UV impact
- Heating and cooling cycles that drive expansion

0 Comments