
Preparation and planning for laminate floor removal
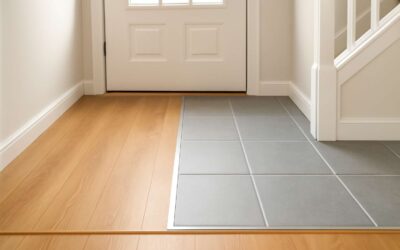
Assess room layout and flooring type
Every successful renovation begins with a lucid plan. I’ve learned that, as one veteran installer sighs, “A map beats a mallet every time.” In South Africa, laminate flooring removal benefits from a careful layout read—polite, practical, and precise—saving dust, time, and budget.
Begin by assessing the room layout and flooring type, noting doorways, alcoves, and future furniture placement. Consider transitions to adjacent rooms, underlayment condition, and potential moisture risk in baths or kitchens. A clear picture now yields a smoother, safer result later.
- Consider room geometry and square footage to anticipate material needs
- Identify access points, thresholds, and opportunities to stage materials
- Check surrounding surfaces and subfloor conditions to foresee compatibility with future flooring
With a plan in place, the journey from room to refreshed surface becomes sensible, respectful of space and schedule, and mindful of local disposal and safety standards across South Africa.
Check warranty, contractor requirements, and building policies
Preparation halts chaos before it begins. A tight plan keeps dust contained, crews aligned, and budgets intact. The moment a project is mapped, interruptions shrink and certainty rises. As one veteran installer says, “A plan beats a mallet every time.”
Before any removal starts, check warranty, contractor requirements, and building policies.
- Warranty coverage for the existing laminate and underlay
- Contractor licensing, insurance, and bonding
- Building policies on noise, disposal, and waste handling
South Africa’s rules steer the process. Ensure waste disposal complies with local norms and that the contractor follows safety standards. The plan for laminate flooring removal aligns with warranty, contractor requirements, and building policies.
Gather essential tools and safety equipment
The quiet power of preparation outshines any gleam of lacquered surface. In South Africa, a thoughtful plan makes laminate flooring removal feel like a measured dance, not a headlong plunge. A clear plan for laminate flooring removal keeps dust contained, crews aligned, and budgets intact!
- Utility knife
- Putty knife or pry bar
- Hammer
- Pliers
- Measuring tape
- Safety goggles
- Respirator or N95 mask
- Work gloves
- Knee pads
- Dust sheets or plastic sheeting
- Dustpan and broom or vacuum
- Rubbish bags or contractor bags
Keep the space clear and exits accessible, and coordinate waste disposal with local norms. With the right gear in hand, you enter laminate flooring removal with confidence and care, turning a potentially chaotic project into a poised and polished transition.
Protect surrounding areas and plan for furniture removal
Effective laminate flooring removal starts long before the first tool touches the floor. A deliberate plan keeps dust manageable, finishes protected, and budgets intact; in South Africa, a thoughtful prep phase often determines whether a project finishes on time or spills into the weekend. The aim is simple: protect surrounding areas and map out a furniture removal plan from the outset.
- Move furniture to a staging area and clear exits
- Seal doorways and cover surfaces to contain dust
- Coordinate waste disposal with local norms and building policies
For laminate flooring removal, a well-orchestrated preparation and planning phase acts as a backbone for the job. It guides decisions, reduces surprises, and keeps the project respectful of neighbours and daily life.
Tools, safety gear, and workspace setup
Must-have tools and equipment list
Nearly 80% of laminate flooring removal projects stumble because the tools aren’t up to the task. The right toolkit reveals a clean reveal and protects your surfaces in a South African home.
- Hammer
- Pry bar or crowbar
- Utility knife and spare blades
- Oscillating multi-tool with a scraper blade
- Circular saw with a fine-tooth blade
- Floor scraper or stiff putty knife
- Chisel set
- Tape measure
Safety gear and a calm workspace complete the equation. Wear gloves, safety glasses, and a respirator; keep knees cushioned with pads. Adequate lighting and plastic sheeting to contain dust—plus a taped doorway to guard the rest of the home—make the job safer and cleaner.
Personal protective equipment (PPE) and safe handling
From Cape Town to Joburg, the opening act of laminate flooring removal is a test of nerves. A surprising 68% of projects stall not from stubborn nails but from neglecting PPE and workspace setup. Dress the scene correctly, and dust, splinters, and sharp edges stay where they belong—in the tool tray, not on you.
- Protective gloves
- Safety glasses or goggles
- Respirator or dust mask
- Knee pads
- Hearing protection
- Non-slip boots
Beyond gear, safe handling rests on a calm, well-lit zone where tools move with purpose and surface protection is non-negotiable. Adequate lighting and clear pathways help keep laminate flooring removal clean and controlled, preserving the home’s finish while reducing risk.
Creating a dust-free work area and containment
In the realm of laminate flooring removal, the quiet confidence of a well-chosen toolkit sets the tempo for the day. Rather than brute force, it offers control and grace, guiding each deliberate motion as layers yield and the space reveals its new self. The result feels almost ceremonial.
PPE and safety gear stand as unseen stagehands—present, steady, and discreet. They shield skin and lungs, letting the room breathe in safety while the work advances with dignity.
A dust-free work area and containment elevate the craft from task to discipline. Bright lighting, clear pathways, and thoughtful barriers transform a room into a sanctuary where dust stays contained and finishes stay pristine.
- Plastic sheeting and drop cloths
- Dust barriers or zippered enclosures
- HEPA-filtered vacuum or dust extractor
- Waste bags or sealed bins
Cordage, waste bags, and disposal planning
“A tidy toolkit is half the job,” a trade truth that lands hard for professionals. Tools optimized for laminate flooring removal save hours and protect finishes: a sturdy putty knife, a rigid pry bar, a sharp utility knife, and an oscillating tool with a scraper blade. Keep blades sharp and edges protected; plan cuts to minimize damage.
A compact, well-lit work zone keeps momentum steady. Clear pathways, prepped waste areas, and ready access to a tidy surface for tool swaps reduce backtracking and save time. Position a waste area close at hand to keep debris contained in the workspace.
Cordage, waste bags, and disposal planning form the logistics spine of any job. The following setup helps maintain order and speed:
- Cordage or strong twine for securing bundles of offcuts
- Waste bags or sealed bins for short and long planks
- Disposal plan aligned with South Africa’s recycling and waste services
Removal methods and best practices
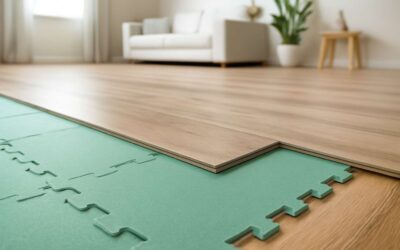
Underlayment considerations and adhesive removal
In South African homes, a single afternoon of laminate flooring removal can rewrite a room’s rhythm, turning quiet spaces into a chorus of creaks and airborne dust. Removal methods range from careful peel-and-lift to more stubborn detachment where glue lingers. The aim is a clean slate that sets the stage for the next floor’s performance.
Underlayment considerations matter just as much as the visible planks. The choice of underlayment—foam, cork, or felt—carries moisture and insulation implications that affect the next flooring. You’ll want to assess compatibility with a fresh layer and avoid trapping moisture that can warp or dull the new surface.
Adhesive removal complicates the narrative, since residues can dull future finishes and demand specialized solutions. In many projects, professionals balance the risk of damage against the lure of a pristine base, choosing methods that respect both the substrate and the planet through responsible disposal.
Dry vs. wet removal techniques
Laminate flooring removal sets the room’s rhythm and pace. In South African homes, the lift you pick can turn a quiet afternoon into a swirl of dust and lifted optimism. ‘A clean base makes the next floor sing,’ says an experienced installer—and I’ve seen it transform spaces.
- Dry removal keeps dust low and speeds up the job.
- Wet removal softens stubborn adhesive, reducing risk to the subfloor.
- Hybrid approaches blend tools for tricky edges without over-wetting.
Choose methods that suit the substrate, local disposal rules, and the next finish. The right approach balances speed, cleanliness, and care for the planet.
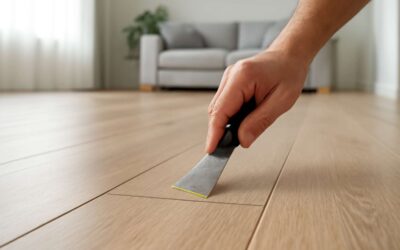
Managing expansion gaps and baseboards without damage
In South African homes, the rhythm of a room shifts the moment laminate flooring removal begins. “A clean base makes the next floor sing,” an experienced installer told me—a reminder that what remains matters as much as what goes.
Removal methods and best practices hinge on respect: the substrate, the edges, and the future finish. For laminate flooring removal, speed must partner with precision, keeping expansion gaps and baseboards intact so the next layer can settle with confidence.
Three guiding considerations:
- Baseboard preservation and delicate edge work
- Edge integrity to minimize expansion stress
- Dust containment and surface protection for adjacent rooms
These principles keep the space ready for what’s next, a quiet testament to care and craft.
Renting vs. owning tools: when to rent a floor scraper or oscillating tool
Light spills differently the moment laminate flooring removal begins here in South Africa. A seasoned installer once told me, “Respect the tool, respect the edge,” and that counsel still rings true. For the task, tool strategy matters more than technique. Renting a floor scraper for a one-off job keeps costs lean and space clear; owning a sturdy oscillating tool can pay dividends across future projects. The aim is balance—speed yoked to precision, preserving the room’s quiet while disruption passes.
- Frequency of future renovations and tool versatility
- Upfront vs rental costs and maintenance
- Storage, access, and support for the gear
Whichever path you choose, the goal remains the same: protect edges and textures while the space takes its breath again, letting the next layer settle with ease.
Waste disposal, recycling, and cleanup
Separating recyclable materials and proper disposal
Waste has gravity, and laminate flooring removal leaves a chorus of scraps that grow overnight. In South Africa, responsible disposal can cut landfill mass and tidy the site in one motion. Sorting at the source keeps recyclables out of landfills—and it makes sense as waste streams move to licensed processors.
Separating recyclable materials isn’t a nuisance; it’s a strategic move. The team identifies timber offcuts, packaging, metals, and adhesive remnants that can be diverted to proper streams. Compliance with disposal regulations ensures materials are processed safely and legally, turning chaos into a resource.
- Wood scraps and laminate offcuts
- Cardboard packaging and plastics
- Metal fasteners and hardware
- Adhesive residues and contaminated materials
Cleanup proceeds with a plan, leaving the space immaculate and compliant, like a room that finally breathes.
Cleaning residual dust and debris from surfaces
“Waste is a resource in disguise,” a sentiment taking root in South Africa’s renovation crews. In laminate flooring removal, the real work begins after the last plank is lifted: sorting and disposal align to a higher aim. Separating at the source keeps landfills smaller and spaces dignified.
Cleanup centers on residual dust and debris; remove it from every surface with damp cloths, HEPA filtration, and careful vacuuming. The room should feel renewed—dust-free and luminous. Cleaning residual dust and debris from surfaces is the quiet finale.
Disposal compliance keeps the process lawful and responsible, ensuring materials travel to licensed processors while the environment is spared. In the end, the space breathes again, a testament to conscious waste management and the beauty of a well-rested project: laminate flooring removal becomes renewal.
Final inspection and post-removal care
Laminate flooring removal marks the finale and the restart. A surprising statistic shows more than 60% of renovation waste in South Africa still ends up in landfills—yet the true art lies in waste disposal, recycling, and cleanup executed with care. Sorting at the source keeps landfills smaller and spaces dignified, turning debris into a resource rather than a reminder of excess.
During laminate flooring removal, the final inspection begins. The room is brought back to brightness with a careful sweep, edges checked, and any adhesive residues treated with reverence. Post-removal care becomes a quiet ritual that preserves the cleanliness and prepares the space for its next phase.
Key steps in the disposal and cleanup phase include:
- Partner with licensed processors for lawful disposal
- Sort recyclable materials at source to maximize reuse
- Keep disposal receipts and compliance records for accountability
Tips for reinstalling laminate or alternative flooring
Across South Africa, renovations spark new light in homes, yet more than 60% of renovation waste ends up in landfills. laminate flooring removal becomes an opportunity rather than a problem, inviting a careful rethink of what can be saved, reused, or transformed into something useful in the next chapter of a space.
Disposal and cleanup are not afterthoughts but quiet acts of stewardship. Materials are treated with reverence, licensed processors for lawful handling prioritized, and reuse opportunities kept alive where possible. Keeping spaces pristine during the transition respects neighbours and the next owner of the home.
- Trusted recyclers with insight into local material streams
- Components identified for reuse or local repurposing
- Records maintained to demonstrate responsible practice
Bright rooms emerge when care guides every sweep and every piece of laminate flooring removal finds a respectful resting place.

0 Comments