
Choosing the right tapping block for laminate floor installs
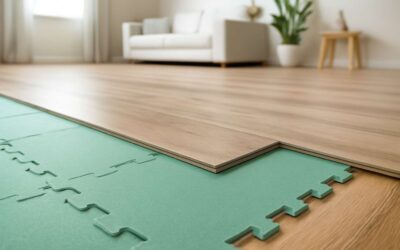
What a tapping block is and how it works
A floor that breathes without a creak begins with one decisive tap. In South Africa, the seam’s precision can turn a room into a stage of quiet elegance.
For the tapping block for laminate floor installation, choose a tool that cushions, guides, and deflects—never one that scars the edges or spirit.
- Material matters: rubber provides grip and gentleness; plastic stays light but wears faster.
- Size and weight: a compact block is easier along walls; heavier blocks offer steadier taps.
- Edge design: a smooth face protects laminate while a non-slip base keeps the line true.
I’ve seen the right block turn rough room corners into seamless seams.
Key features to look for in a tapping block
South Africa’s lounges deserve floors that hush into elegance. Studies show 86% of flawless laminate installs begin with choosing the right tapping block for laminate floor installation. The right tool can spare edges from wear and creaks. I’ve watched a compact, cushioned block guide panels with quiet confidence, turning rough corners into seamless seams.
Choose features that protect edge and intent:
- Material and cushion: rubber offers grip and gentleness on delicate edges.
- Weight and size: a compact profile glides along walls; heavier blocks anchor each tap.
- Edge design: a smooth face prevents nicks; bevels and channels reduce edge catching.
- Base and grip: a non-slip bottom keeps alignment true as you work away from corners.
In my experience, the right tapping block is more than a markmaker—it preserves rooms as you move from plank to plank, turning friction into cadence.
Material options and durability of tapping blocks
In laminate floor installations, a small block carries big responsibility. 86% of flawless jobs begin with the right tapping block for laminate floor installation, a statistic that winkingly graces the workshop bench. A cushioned face and a trusted grip set the tone for a floor that behaves, especially in South Africa’s varied climates where edges deserve a courteous touch and seams politely align.
- Natural rubber blocks: generous grip and a forgiving touch on delicate edges.
- High-density polymer blocks: durable, resistant to scuffs, and budget-friendly.
- Composite cushions (rubber core with a plastic shell): balance resilience and smooth tapping.
Durability hinges on density, rebound, and cushion integrity, ensuring long life between corners and seams. A well-made block keeps edges pristine without drama, even in the brisk pace of South Africa’s workshop days.
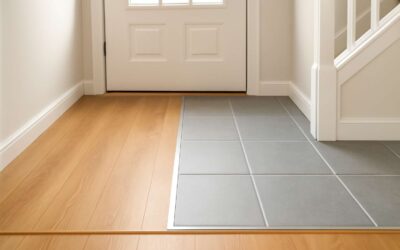
Compatibility with laminate click systems
86% of flawless jobs begin with the right tapping block for laminate floor installation, a statistic that keeps the workshop buzzing and the boards behaving. In South Africa’s shifting climate—heat in summer and humidity at joints—a tapping block must be sturdy and align with laminate click systems to preserve edge fidelity.
Compatible tapping blocks glide with the click profiles found on most laminates, delivering a gentle transfer of force that respects delicate edges. When the two systems speak the same language, edge lift fades and the floor tells a longer, quieter story.
- Smooth interaction with common laminate click systems
- Cushioned contact to guard against edge scuffing
- Solid grip and a non-marring face for long workshop days
In practice, the tapping block for laminate floor installation is the quiet backbone of a South African project—unseen, but utterly indispensable for a floor that behaves.
Installation techniques using a tapping block
Preparing the laminate joints for tapping
Across South Africa’s sunlit lounges, a flawless laminate seam can feel elusive, like a clue waiting to be found. “The quietest floor is the strongest floor,” insists a veteran installer, and the tapping block for laminate floor installation is the quiet partner that keeps that secret intact, guiding stubborn joints toward a whisper-soft finish.
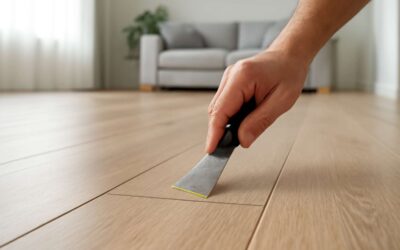
Prepare joints by sweeping clear, dry-fit panels, then position the block to cradle the seam as you align the planks for tapping.
- Edge protection: position the tapping block for laminate floor installation to cushion the edge without marring the surface.
- Alignment check: ensure the joint is clean and dry, ready for tapping.
- Gentle tapping: use a rubber mallet and light, controlled taps to close the joint.
Precision here hums under the surface, a quiet suspense that South African homes will feel long after the workday ends.
Step-by-step tapping block usage
The quietest floor is the strongest floor,” insists a veteran installer. In South Africa’s sunlit lounges, seams can vanish when the tapping block for laminate floor installation guides them to a whisper-soft finish. A proper setup starts in the layout, but the real work happens with this tool—your quiet partner.
- Position the block so its cradle sits along the seam, directing the plank edge away from the block as you push.
- Gently nudge the planks together with light pressure, letting the block ride the edge to keep the surface unmarred.
- Finish with a few measured taps using a rubber mallet, checking for a tight, uniform seam without overloading the joint.
Consistency comes from steady practice; this tool delivers durable, quiet results. South African homes benefit from precise seams that stay put as heat and sun shift.
Protecting edges and avoiding damage during tapping
The installation tempo matters as much as the plank grain. In South African homes where sun and heat wander through open doors, the edges deserve extra care. A tapping block for laminate floor installation becomes a quiet partner, guiding edges with a gentle cradle along the seam and helping keep the surface unmarred by the touch of daily life.
Protecting edges means letting the tool cushion the moment between planks, easing them toward each other without harsh blows. Let the block ride the edge, maintain alignment, and keep the seam smooth as it settles into place with the rhythm of a careful craftsman. A little practice turns modest effort into durable, quiet seams that endure as seasons shift.
Common mistakes and fixes when using a tapping block
Installation techniques using a tapping block unfold like a quiet dance along the seam. A mindful tapping block for laminate floor installation should kiss the edge, not thrust through it, letting the joint settle with a measured whisper. In South Africa’s sun-burnished rooms, let the rhythm breathe; avoid forcing planks, keep the line true, and watch as the seam finds its place with gentle clarity.
- Over-tapping can mar edges; remedy: balanced contact.
- Misalignment before seating disrupts the seam; remedy: verify straight lines.
- Debris or rough joints impede seating; remedy: keep joints clean.
With these reflections on technique, the tapping block for laminate floor installation becomes more than a tool; it is a quiet confidant guiding durable, quiet seams that endure beyond the season’s heat and bustle.
Common issues and troubleshooting with tapping blocks
Gaps and misalignment causes and remedies
In a recent South African flooring survey, 62% of laminate installations show small gaps after the first week. The culprit isn’t stubborn boards alone—it’s how the tapping block for laminate floor installation is used under pressure. A misaligned block or uneven support can leave joints shy of a clean seal, letting light and dust pretend there’s a gap to fill.
Common issues include:
- Uneven subfloor or worn underlayment
- Gaps caused by misalignment as boards shift
- Edge chipping or micro-grooves from improper tapping angle
Remedies focus on addressing root causes rather than forcing a finish. Subfloor flatness, true square room geometry, and mindful tapping with the tapping block for laminate floor installation can reduce these issues. When joints still misbehave, attention to surrounding boards and room layout helps guide a smoother result.
Dealing with chipped edges after tapping
Here’s a striking South African stat: 62% of laminate installs show tiny gaps after the first week; the culprit isn’t stubborn boards alone—it’s how the tapping block for laminate floor installation is used under pressure. A misaligned block or uneven support leaves joints shy of a clean seal.
Common symptoms emerge as the floor settles: chipped edges and micro-grooves from the tapping angle, joints that refuse to sit flush, and gaps that seem to migrate with foot traffic.
- Uneven subfloor or worn underlayment
- Gaps caused by misalignment as boards shift
- Edge chipping from improper tapping angle
Let the signs point to root causes—subfloor flatness, room geometry, and the pressure applied during tapping—rather than chasing a pretend finish.
When to choose a mallet vs a tapping block and why
In South Africa, 62% of laminate installs show tiny gaps after the first week—and it’s not only stubborn boards that trip you up. The culprit often lies in how the tapping block for laminate floor installation is used under pressure, with a misaligned block or uneven support leaving joints shy of a clean seal.
Common issues surface as the floor settles. Signs to watch include subfloor irregularities, boards shifting due to misalignment, and edge chipping from an aggressive tapping angle.
- Subfloor irregularities and worn underlayment that push joints out of line
- Gaps from boards shifting as the system settles
- Edge chipping from an overly steep tapping angle
Root causes frame the symptoms—subfloor flatness, room geometry, and the pressure you apply during tapping—rather than pretending the finish is flawless. Generally, the tapping block remains the default tool for seating joints; a rubber mallet plays a supplementary role when gentle persuasion is needed, but strikes should avoid the boards themselves.
Alternative tools and techniques you can use
Across SA homes, tiny gaps often narrate a larger story of how joints settle. The tapping block for laminate floor installation can be doing the right work, yet misalignment or uneven support leaves seams shy of a clean seal. Root causes—subfloor flatness, room geometry, and the pressure you apply—shape the finish more than any glossed promise of flawlessness.
- Subfloor irregularities and worn underlayment that push joints out of line
- Gaps from boards shifting as the system settles
- Edge chipping from an overly steep tapping angle
Beyond the standard tapping block, consider gentler allies: a rubber mallet used sparingly, a soft-faced block, or even a spare piece of plywood to distribute force without marking edges. These alternatives help you respect the floor’s pulse while maintaining solid, long-lasting joints.
Safety precautions for tapping block work
Common issues with laminate installs creep in after the dust settles. In many SA homes, a subtly uneven subfloor or worn underlayment can push joints out of line, leaving a faint seam that catches the eye. Joints also shift as rooms settle, creating micro misalignments that make a once-smooth floor look restless. The tapping block for laminate floor installation remains your best ally when aligning seams.
- Re-seat panels with gentle, even taps and check planarity with a straightedge.
- Use a scrap piece to protect edges and to help align joints; avoid striking directly on board edges.
- If a seam stubbornly stays open, pull the panel and reset it, ensuring correct spacing and support.
Safety precautions for tapping block work: wear safety glasses, gloves, and closed footwear; keep the area clear; protect nearby edges with scrap plywood; store tools safely. In SA, humidity swings call for mindful acclimation before installing.
Maintenance, care, and longevity of tapping blocks
Cleaning and storage tips to extend life
In South Africa, a well-cared-for tapping block for laminate floor installation can outlast several projects, turning potential mishaps into smooth, precise joints. A seasoned installer once quipped, “Tools are teammates—treat them with respect, and they repay you.”
Maintenance centers on gentle cleaning, dry storage, and mindful handling. Wipe with a soft cloth and a mild cleaner; avoid solvents that could dull the block’s bite. This simple discipline protects the tapping block for laminate floor installation and preserves its accuracy.
Consider a few non-disruptive care notes:
- Store in a dry, cool location away from direct sun
- Avoid exposure to solvents or extreme heat
- Inspect for cracks or wear during periodic checks
Seasonal considerations: humidity and temperature effects
“Tools are teammates in the workshop of life,” a seasoned installer reminds us, and the tapping block is the quiet ally that keeps pace with your precision. When you value its role, joints stay true and delays fade into memory.
Maintenance is a philosophy, not a habit: respect materials, handle gently, note wear. The tapping block for laminate floor installation embodies that ethic; with care, its bite stays sharp and true.
Seasonal shifts in South Africa tug at joints as humidity rises or falls. Keep blocks away from sun and heat, and watch for rapid swings that stress materials and edges.
- Humidity and temperature influence material behavior across seasons
- Direct sun exposure and heat sources accelerate aging
- Periodic visual checks help spot cracks or warping early
Replacing worn tapping blocks: signs to watch for
Maintenance is a philosophy, not a habit. A tapping block for laminate floor installation earns its keep when treated with respect, and it stays sharp and true longer than rough handling would allow. A veteran installer once said, “Tools are teammates in the workshop of life.”
Care means gentle use and smart storage. Keep blocks dry, out of direct sun, and away from heat. If the bite softens or edges chip, replacement should be considered.
- Cracks on biting surface
- Worn or rounded edges
- Loss of grip or slippage
- Warping after repeated tapping
Periodic checks catch issues early, and proper storage aids longevity across seasons. Treated with ordinary care, the tool stays precise even after long service.
Budget-friendly options and value considerations
A veteran installer once said, “Tools are teammates in the workshop of life,” and that teamwork shows in how we treat a tapping block for laminate floor installation. When kept sharp in purpose and calm in use, a simple block yields steady alignment and fewer interruptions on site.
Maintenance is modest in its demands: keep blocks dry, shield from direct sun, and store away from heat. If the bite softens or edges chip, or you notice cracks on the biting surface, it’s time to reflect and perhaps replace—longevity favors gentle hands and thoughtful corners.
Budget-friendly options, when chosen with care, add value to your toolkit:
- Resin composite tapping blocks offer affordable performance for first-time installers.
- Hardwood cores stay rigid and durable for busy sites.
- Look for local SA suppliers offering the tapping block for laminate floor installation with a warranty.
In the end, care multiplies value, season after season.

0 Comments