Fitting Essentials for Laminate Flooring
Key Tools and Materials for Laminate Flooring Installation
“Precision is a quiet craft,” they say—perfect for laminate floor with fitting, where every click locks a promise of endurance. In South African homes, the difference isn’t the surface; it’s the steady confidence of a well‑planned setup and edges that meet with flawless alignment.
Fitting Essentials for Laminate Flooring hinge on the right key tools and materials. Here is the backbone of a clean, enduring install:
- Measuring tape
- Spacers
- Tapping block
- Pull bar
- Utility knife
- Saws with fine teeth
- Underlayment
- Moisture barrier
With these elements in place, a floor emerges with quiet confidence—a finish built to resist wear and carry the footsteps of SA homes for years.
Understanding Subfloor Preparation for a Smooth Fit
In SA homes, a perfect floor begins before the first plank meets the light. The laminate floor with fitting hinges on subfloor discipline—the quiet prep that carries years of foot traffic with effortless grace. “Measure twice, lay once,” says the old tradesman, and the floor replies with a seam that sits true.
To set the stage for a smooth finish, focus on the surface you’ll install over. Here are essential checks that keep gaps and creaks at bay:
- Moisture content within accepted range
- Surface level within tolerance
- Dust-free, smooth, and clean plane
When these conditions hold, the floor locks together with a quiet confidence—ready to weather SA summers and winter chills without complaint.
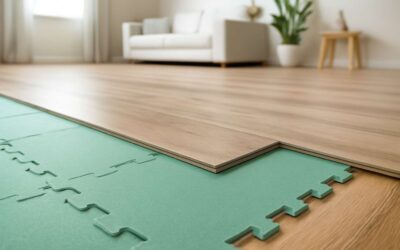
Choosing the Right Underlayment for a Durable Finish
Industry data suggests underlayment can cut impact noise by up to 60%, a statistic that makes every step feel surprisingly civil in a busy SA home. The right underlayment for a laminate floor with fitting isn’t cosmetic—it’s the foundation for durability, warmth, and quiet confidence.
- Moisture-resistant barriers for damp SA slabs
- Foam underlay for comfort underfoot
- Cork for sound dampening without the stiffness
- Rubber or dense composites for stability in heat
Beyond material choice, consider thickness, density, and climate compatibility. In SA’s mix of concrete and timber subfloors, a balanced underlayment keeps expansion joints calm and creaks at bay. The right layer becomes a quiet collaborator in any room.
Choose thoughtfully, and your spaces will feel warmer, quieter, and built to endure the whims of seasonal heat and cold in South Africa.
Acclimation Requirements and Temperature Guidelines
Across South Africa’s climate swings, acclimation is the quiet foundation of a laminate floor with fitting. Industry notes suggest that when boards spend time in the room’s ambient conditions, movement can drop by a few percentage points, keeping seams snug and planks true. I’ve seen a space transform as the boards settle, their edges softening into the room’s character. It’s the kind of patience that makes a finish feel durable before the first nail is tapped.
Acclimation requirements hinge on steady air and sensible temp. Keep the stock in the installation area until the room temperature stabilizes, avoiding direct sun and gusty drafts. Aim for 18-24°C and relative humidity 40-60%. In SA’s mix of air conditioning and open windows, these conditions are easier to achieve with thoughtful planning.
- Room temperature and humidity stabilization
- Seasonal SA climate considerations
- Storage away from heat sources and moisture
Safety Tips for Handling Laminate and Tools
A well-fitted laminate floor with fitting can elevate light and life in a room, a quiet triumph of craft and patience. In SA homes, a thoughtful fit can lift perceived value by up to 15%.
Fitting essentials begin with safety and respect for the material—handle each plank with care, guard your eyes, and honor the room’s temper as it welcomes a new surface on a laminate floor with fitting.
- Protective gloves
- Safety glasses
- Dust mask
- Organized workspace
The right tools help keep the rhythm of your project, and a calm room becomes part of the finish of a laminate floor with fitting.
Planning Your Laminate Floor Fitting Project
Accurate Measurements and Space Planning
Measure twice, cut once — it’s the quiet creed behind every enduring surface. In planning your laminate floor with fitting, what you see on the blueprint becomes the rhythm of the room. South African homes often juxtapose sunlit living spaces with snug corridors; those contrasts demand honest space planning that respects door swings, alcoves, and the flow of footfall.
Space planning isn’t a math problem alone; it’s a mood. I linger on how a floor catches light at different times of day, how seams align with furniture, and how the room breathes when a family moves through. Above all, trust the measurements to guide a finish that feels right, durable, and quietly confident.
Selecting Laminate Planks: Grade, Color, and Texture
Lamplight spills across a laminate floor with fitting, and rooms soften into warmer tones. Selecting laminate planks is more than color swatches; it’s grade, color, and texture shaping the room’s rhythm. A floor becomes the canvas for light and furniture to dance!
Consider these core choices as you plan the plank set.
- Grade and wear: consider durability for everyday family life.
- Color: pale sands to rich chestnut to suit light and mood.
- Texture: embossed realism versus smooth for tactile depth.
- Pattern and plank size: width and length alter space perception.
In South African homes, sun moves across a room and alters the tone of your laminate floor with fitting. Let daylight breathe the palette and harmonize with doorways and alcoves. The right choice offers durability, easy maintenance, and a quietly confident finish that lasts.
Layout Patterns and Expansion Gaps
Floor planning is the whisper that makes a room sing. In design terms, up to 60% of a room’s mood comes from its floor and how it guides light. A well-chosen laminate floor with fitting invites daylight to flow along long walls and softens corners into harmony.
Plan layout patterns and expansion gaps by considering sightlines, furniture rhythm, and traffic paths.
- Brick or running bond with staggered joints
- Herringbone or parquet-inspired layouts
- Allowance for doors, alcoves and natural sightlines
These choices influence how rooms feel—wide and airy or snug and intimate—while supporting a seamless transition between spaces in South Africa.
Budgeting for Materials and Tools
Rooms in South Africa breathe with the heartbeat of their floors; a room’s mood follows the grain, and a whispered truth links light to planks: up to 60% of tone comes from the floor. A well-chosen laminate floor with fitting invites daylight to glide along long walls, directing traffic and softening corners into harmony, turning space into a poem that moves with you.
- Laminate planks
- Underlayment and moisture barrier
- Transition strips and edge finishes
- Spacers, tapping block, pull bar
- Saw blades or a laminate cutter
- Safety gear and disposal considerations
Budgeting reads as a quiet map of place—South Africa’s suppliers, price variation from town to town, and the gentle truth that some waste is inevitable. A thoughtful plan considers both materials and tools as a single, bonded craft. In the end, budgets free your flooring project to become a living part of your home.
Defining a Realistic Timeline for the Job
Planning a laminate floor with fitting is more than a calendar exercise—it’s a forecast of light, grain, and pace. In South Africa, where daylight slides along long walls and rooms breathe with their climate, a realistic timeline keeps the project calm and the finish precise.
Set a window that honors delivery, acclimation, and the rhythm of your space. Allow for gentle buffers where weather and suppliers temper the clock, and treat time as a craft ally rather than an adversary.
With glassy boards soon singing under tight seams, the job moves from plan to presence. The clock wears fewer creases when patience meets daylight and a room learns to settle into its new voice.
Step-by-Step Laminate Floor Fitting Process
Unpacking, Acclimation, and Preparation
“Preparation is the seed of a flawless floor,” a craftsman once whispered, and the unpacking ritual confirms it. The journey to a seamless finish begins as the laminate floor with fitting cartons crack open, revealing planks and protective spacers, ready to be assessed in daylight.
Unpacking, inspection, and a calm toe-hold on the process set the tone for care. Acclimation and preparation then follow, inviting the boards to harmonize with the room.
- Unpack the cartons, lay planks flat, check for damage, and verify measurements against the plan.
- Acclimation: rest boards 48 hours at stable temp and humidity, away from drafts and heat.
- Preparation: clean the subfloor, remove debris, and mark expansion gaps for a breathing fit.
With patience, the stage is set for a durable, uniform finish that honors SA homes and their unique light.
DIY vs Pro Fitting: Making the Right Choice
Two doors stand between dream and decked reality: the DIY sprint and the pro’s measured craft. “A floor begins where the plan ends,” a seasoned tradesman once whispered, and the truth rings in every bevel and seam. For the laminate floor with fitting, the choice hinges on tempo and prudence, not mere tool polish, especially as SA light shifts across rooms.
- Budget and timeline alignment
- Room complexity, access, and safety considerations
- Warranty expectations and service options
Whichever path you choose, the aim is a luminous, enduring surface that holds its rhythm through sunrise and sundown, a floor that thrives in South Africa’s unique light—quietly confident, quietly true—the promise fulfilled when the fit feels inevitable in every room of a home.
Floating Floor Fitting Method: How It Works
“A floor is a quiet agreement between room and light,” a veteran fitter whispered. In laminate floor with fitting, the floating method turns a single click into room-wide harmony, especially under South Africa’s shifting daylight. It reads rhythm, not brute force—precision reigns!
Here’s the step-by-step for a floating floor fitting, a process where each plank links in the tongue-and-groove flow of a laminate floor with fitting.
- Start along a straight wall; keep the line true.
- Lock each plank to the next with a light tap.
- Trim the final row to fit, preserving the expansion gap.
- Attach moldings and inspect transitions to finish the look.
In the end, SA light settles into a quiet shine. It’s not just installation; it’s a laminate floor with fitting that respects space, rhythm, and time.
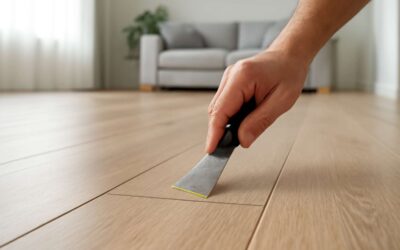
Cutting, Fitting Edges, and Corner Adjustments
In South Africa, the rhythm of daylight alters room perception by up to 15%, and a truly quiet floor ties light to space. The laminate floor with fitting isn’t merely installation; it’s choreography—precision as a compass, guiding every seam to hush into harmony. Step-by-step, we approach Cutting, Fitting Edges, and Corner Adjustments with patient care.
- Cutting to fit: Mark lines with a steel rule, leave a small expansion gap, score with a fine blade, and snap cleanly for a tight, respectful edge.
- Fitting edges: Align planks along the wall, tap lightly to lock into tongue-and-groove, checking for flush joints as you go.
- Corner adjustments: Trim the final rows to fit, scribe around irregular corners, then test-fit before final snip and set.
As I step back, the line breathes and the room settles into a calm, durable surface. This is more than material—it’s a promise of the laminate floor with fitting that honors space, rhythm, and light.
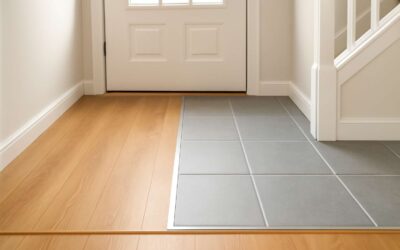
Finalizing Transitions and Thresholds
Transitions are the unsung heroes of a finished space. In South Africa, where daylight plays tricks with texture and shade, a threshold done right can make a room feel bigger, calmer, and unmistakably real. The final phase isn’t a flourish—it’s a calibration: a laminate floor with fitting that learns where to breathe, bend, and disappear into the trim.
To lock in those transitions and thresholds, consider these focal points:
- Expansion room at the doorway and the last row
- Flush joints and alignment along planks
- Scribing around irregular edges and pre-finalization test-fitting
When everything clicks, the line settles into a quiet, durable surface. This laminate floor with fitting is more than a product—it’s a promise of seamless flow and room-to-room harmony.
Finishing Touches and Maintenance After Fitting
Sealing Transitions and Thresholds for a Seamless Look
Seamless design is the luxury that never goes out of style. In South Africa, where light plays across surfaces, a room’s mood hinges on the finish—the quiet glow that follows you from hall to living area. A laminate floor with fitting frames every step in a single, uninterrupted line, letting texture and shade tell the story. Finishing touches, from edge detail to skirting integration, should feel inevitable, as if the boards were laid by a single breath.
Sealing transitions and thresholds is where craft meets poetry. A trim and sealant choice speaks in the same tone, while thresholds glide under doors for a seamless procession. Consider these design attributes:
- Sealant harmonises with plank color
- Thresholds align with door heights
Maintenance becomes a quiet ritual of care, preserving the room’s memory.
Cleaning Protocols to Extend Floor Life
A floor speaks softly, lasting longer than its shine. In sunny South Africa, light travels like a storyteller across boards, and the finish must keep pace. A laminate floor with fitting becomes a quiet, continuous line, truthfully showing texture and shade in every room. Transitions and edges should feel inevitable, as if laid by a single breath, a symmetry you can sense in every doorway and corridor.
Maintenance after fitting is a stanza of care, not a chore. Cleaning protocols should honor the surface—gentle dusting, minimal moisture, and the avoidance of harsh chemicals—so memory remains intact across years. Treat the floor as a living page, and it will reward you with durability and quiet beauty.
Troubleshooting Common Fitting Issues
A floor that speaks softly and lasts longer than its gloss—South Africa’s sun is a stern critic, and a laminate floor with fitting answers the challenge with poise. Finishing touches should read as one ribbon, a continuous line from entry to lounge. When the work feels effortless, transitions glide, doors open with a breath, and the room breathes in shade and texture.
Finishing touches after fitting are delicate choreography: trim around edges, balance against skirting, and a calm boundary where surfaces meet. Troubleshooting common fitting issues arrives as quiet signals from the boards.
- Gaps or misalignment along wall edges
- Peaks, cupping, or sunk planks in humid rooms
- Unwanted creaks or clicking in busy zones
Maintenance after fitting reads as a quiet ritual, favoring gentle dusting, mindful moisture, and avoidance of harsh chemicals. Treat the floor as a living page, and it will reward with durability and quiet beauty for years.
Moisture Management and Wear Prevention
The hush after a laminate floor with fitting feels like a cathedral corridor under South Africa’s sun, where glare tests the gloss and the planks endure with patient poise. Each plank wears its own weather, a quiet testimony to craft and care.
Finishing touches arrive as a single ribbon of continuity, a seamless line from entry to lounge. The room breathes as transitions glide, the doors open with a breath, and shade and texture settle into a unified mood.
Maintenance after fitting becomes a quiet ritual—a balance of moisture and wear. The laminate floor with fitting preserves its narrative when the sun and air cohere, resisting the patina of time with restrained glow. It rewards patience with durability and quiet beauty for years.
Tips to Extend Laminate Flooring Longevity
Finish is protection you can feel underfoot, a veteran installer notes. In South Africa, the hallway is the heart of a home, where a well-fitted floor sees daily traffic. The finishing touches on a laminate floor with fitting create a corridor of calm—from entry to living room—where seams vanish and a single line of light glows. Trim profiles, skirtings, and thresholds frame the space, while a careful edge seal keeps dust and moisture at bay.
Maintenance after fitting becomes a quiet ritual. A little care goes a long way, keeping tones even and the sheen subtle.
- Wipe spills promptly with a damp microfiber cloth; avoid soaking the seam lines.
- Place welcome mats at entrances and maintain humidity between 40-60% to reduce gaps.
- Use water-based cleaners and avoid waxes or abrasive products that dull the finish.
Costs, Warranties, and Purchasing Guide
Cost Breakdown: Materials, Tools, and Labor
In South Africa, a well-fitted laminate floor can lift a room’s value and cut remodeling time—nearly 60% of homeowners report a higher perceived value after a floor upgrade. The costs you face become clearer when you separate materials, tools, and labor, and when warranties back the finish, you gain peace of mind with every step.
Warranties for a laminate floor with fitting typically range from 15 to 25 years for residential use, with terms tied to acclimation, moisture control, and professional installation. DIY work can affect coverage, so choose trusted installers who follow manufacturer’s guidelines for underlay and transitions.
- Materials: laminate planks, underlayment, moisture barrier, trim
- Tools: saw, tapping block, pull bar, spacers, measuring tape
- Labor: professional fitting vs. DIY; price depends on room size and complexity
Purchasing guide: choose a reputable brand and verify warranty terms with installation. Compare suppliers for bulk discounts, delivery speed, and return policies. For a smooth laminate floor with fitting, ensure measurements align with pack quantities and the warranty in mind.
Warranty Details for Laminate Floors
South African homes show a striking truth: the laminate floor with fitting can redefine a room’s rhythm and its perceived value. Nearly 60% of homeowners report higher value after a floor upgrade. Costs shift with room size and complexity, but a 15–25 year residential warranty helps justify the investment.
Warranty details anchor confidence: acclimation, moisture control, and professional installation commonly determine coverage. Underlay and transitions, and maintenance shape claims, while DIY work can void terms unless explicitly permitted by the manufacturer.
- Acclimation and moisture guidelines
- Underlay and transitions
- DIY considerations and coverage
Purchasing focus: select a reputable brand and verify warranty terms with installation. Compare suppliers for bulk pricing, delivery speed, and return policies. For a smooth installation, ensure pack quantities align with measurements and warranty expectations.
Where to Buy Quality Laminate and Fitting Supplies
Costs for laminate floor with fitting vary with room size, pattern, and preparation needs, but the payoff is significant in both aesthetics and perceived value for South African homes.
- Bulk pricing and volume discounts
- Delivery speed and service coverage
- Return policies and warranty terms
Warranty details hinge on proper installation and product preparation, with common residential terms spanning 15–25 years in many markets, including South Africa. A professional fit and careful moisture considerations help protect the investment.
Purchasing guide: seek a reputable brand and verify warranty terms with installation. Compare suppliers for bulk pricing, delivery speed, and return policies. For a smooth project, align pack quantities with measurements and the laminate floor with fitting expectations.
Seasonal Promotions and Bulk Deals
A well-laid laminate floor with fitting can transform a room in an afternoon, and seasonal promotions can dramatically trim the upfront cost.
Seasonal promotions and bulk deals drive value—bulk pricing, faster delivery, and favourable return policies for the laminate floor with fitting.
- Seasonal discounts on bulk packs
- Extended warranty options
- Speedy delivery windows
Warranty terms hinge on installation quality and moisture control, with residential spans often 15–25 years in South Africa.
Purchasing guide essentials: choose a reputable brand, compare suppliers for bulk pricing and delivery speed, and ensure packaging aligns with space measurements.

0 Comments