Why Gaps Appear in Laminate Flooring
Environmental Factors and Humidity Swings
The summer humidity in Durban makes laminate planks swell. A few months later, a dry Highveld winter pulls the moisture out, and the boards contract. The result is a visible gap between seams. We see this often in Johannesburg homes. These gaps are not a manufacturing defect. They are a physical response to environmental factors and humidity swings. Coastal regions bring one set of challenges, while inland areas bring drier air and bigger temperature drops. Consider what triggers the movement:
– Air conditioners that dry out a single room
– Seasonal shifts between wet and dry months
– Morning sunlight hitting a specific area of the floor for hours
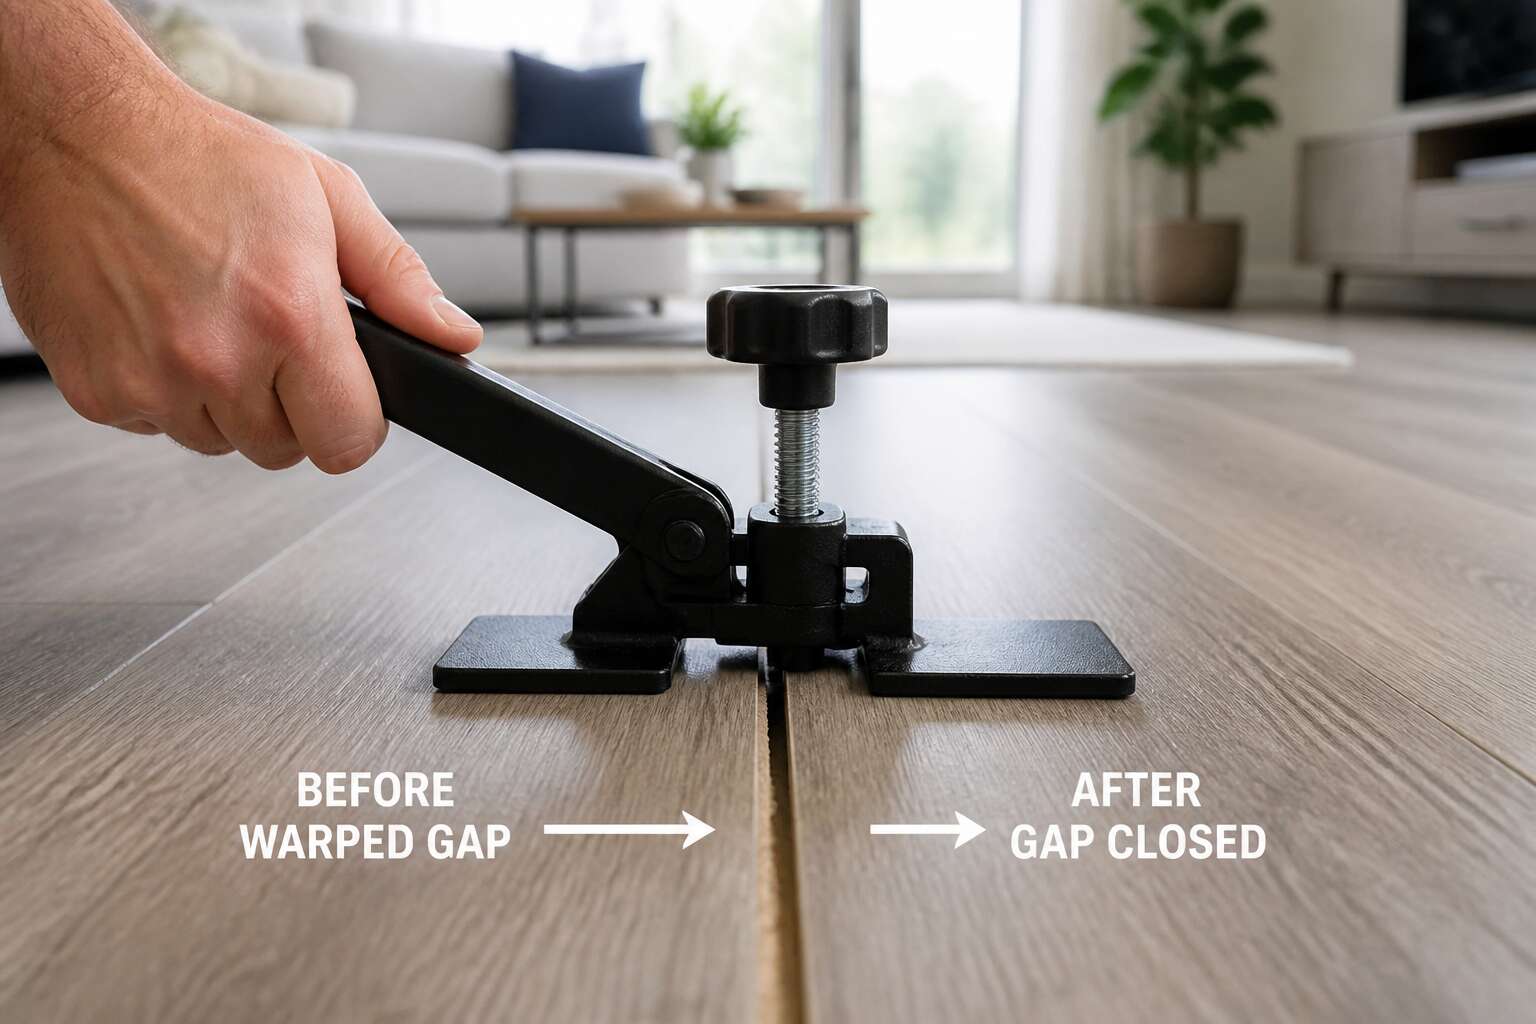
A dramatic swing can happen in a single day. That is why a laminate floor gap fixer tool is useful. It helps close those spaces, but the root cause always comes back to moisture levels.
Improper Acclimation Before Installation
The skipped step is acclimation. A laminate floor gap fixer tool can close the visible result, but the real problem starts before installation. Planks arrive from the warehouse with their own moisture content. When they are fitted immediately, they have not adjusted to the room where they will live.
The process is simple physics. A board that absorbs moisture expands. A board that loses moisture contracts. In South Africa, the timing of installation matters. A floor fitted in a dry Johannesburg winter will swell in the summer. A floor fitted in a humid Durban summer will shrink later.
Consider what happens with a rushed installation:
- Boards are locked in tightly with no forgiveness
- Expansion pressure builds and then releases
- Gaps appear at the seams weeks later
- The floor looks like it has aged years in months
The manufacturer specifies acclimation times for a reason. The instruction sheet is not a suggestion. A laminate floor gap fixer tool addresses the symptom, not the skipped step.
Subfloor Imperfections and Wear Over Time
Subfloor imperfections are common. A floor laid over a slab that dips or swells forces planks to flex. That flexing puts pressure on the locking edges. The locking edges eventually give way. Gaps appear. A laminate floor gap fixer tool can close those seams, but the uneven base remains.
Wear over time adds a second layer of trouble. Daily foot traffic, moving furniture, and constant use loosen the boards. The locking systems lose their grip. The seams creep open.
I have seen these warning signs:
- Visible light through seams
- Clicking sounds underfoot
- Gaps that widen after cleaning
Those gaps become permanent features. The right laminate floor gap fixer tool pulls them together for a while. The subfloor, however, does not change!
Essential Gap Fixing Tools for Laminate Floors
Pull Bars and Tapping Blocks
Pull bars and tapping blocks are the unsung companions of laminate repair. They fit into spaces your hands cannot reach, coaxing boards back into alignment without bruising the surface. A laminate floor gap fixer tool often works alongside these simple devices, turning a stubborn joint into a seamless seam.
Consider what each device contributes:
- A pull bar hooks the board edge and pulls it tight.
- A tapping block absorbs hammer blows, sparing the tongue and groove.
I have seen a single pass with a pull bar close a gap that widened over a wet Cape Town winter. Pair it with a tapping block, and the board settles as if it never moved. The right tools do not disguise the problem when using a laminate floor gap fixer tool; they answer it directly.
Lever-Arm Pullers and Wedges
When gaps resist the pull bar, lever-arm pullers and wedges step in. The puller grips the board edge and uses mechanical leverage to draw it toward the joint. Wedges hold space open while you work, preventing the surrounding boards from shifting against you.
A laminate floor gap fixer tool of this kind rewards patience. Apply the lever gradually. Watch the seam close in small increments rather than one violent snap. The wedge, once placed, holds position while your hands manage the puller.
What separates a capable setup from a frustrating one:
- Lever length. A longer arm gives more control with less force.
- Wedge material. Hard plastic beats soft wood, which dents.
- Surface contact. Broad, flat faces protect the laminate finish.
In older Cape Town flats, where floors have settled unevenly, this pairing proves especially useful. I have watched a single wedge hold a stubborn seam open while the lever-arm puller did its quiet work.
Angled Flat Bars for Tight Spaces
In tight spaces, the angle matters more than the force. A standard pull bar cannot reach the gap that forms beneath a window frame or behind a door trim. The angled flat bar slides its slim, bent head into the narrowest joint, translating your push into lateral pressure. I have used this laminate floor gap fixer tool in Cape Town flats where the floor meets a built-in cupboard, and the seam closes without gouging the boards.
The bar’s curvature keeps your hand away from the wall, so you apply steady pressure without scraping paint. A short, rounded lip grips the board’s edge without biting into the finish. That matters when the gap is a few millimetres wide and any slip leaves a permanent scar.
- Bar thickness, thin enough to fit, thick enough to resist bending.
- Handle length for leverage while clearing obstructions.
- Coating to avoid scratches.
This tool does not draw the joint shut alone. It works with a tapping block or puller, but it reaches places they cannot.
Choosing the Right Gap Fixer for Your Floor
Matching the Tool to Your Locking System
Selecting a laminate floor gap fixer tool for South African laminate floors begins with identifying your locking system. A standard 45-degree click joint responds well to a pull from the surface edge. A fold-down system, common in many imported boards, requires a fixer that applies pressure along the horizontal axis only.
Here is a quick reference for common locking types:
- Unilin and Välinge profiles accept a curved pull bar.
- 5G and Megaloc systems need a wedge with a thin front.
- Glue-down planks work with a flat-tipped flat bar.
I have seen DIYers ruin boards by using the wrong tool on a 5G lock. The locking clip breaks silently, leaving a gap that widens over time. A fixer designed for that system prevents the fracture.
Handle Length and Leverage Considerations
A short handle on a laminate floor gap fixer tool shifts the force into your wrist. South African floors, with dense core boards and textured surfaces, resist sudden pulls. A longer handle offers the mechanical advantage to apply steady, horizontal pressure without trembling. Leverage matters more than muscle.
Check the fulcrum position before you buy. The distance from the pivot to your grip determines how much force reaches the board edge. An adjustable handle lets you change that ratio for different rooms. In tight spaces, a shorter handle may seem practical, but it demands more effort. That effort transfers into the plank and can crack the lock.
- Handle reach of 300 mm from the fulcrum.
- Grip comfort under twenty seconds of sustained pressure.
The right laminate floor gap fixer tool aligns with the natural line of force from your arm. It does not ask your fingers to do the work of your shoulder.
Assessing Build Quality and Durability
Choosing a laminate floor gap fixer tool without inspecting its pedigree is a gamble. The body should be forged from hardened steel or cast aluminium, not stamped tin that flexes under load. I have watched cheap tools bend on the first pull, their fulcrums biting into the very boards they were meant to save. Check the contact edges for a machined finish. A rough casting will scratch the locking profile and leave visible marks on textured planks.
Durability hinges on three critical aspects.
- The pivot pin must be solid steel, not a riveted wire that shears under diagonal pressure.
- The claw tip needs a sharp, square face to grip the board edge without slipping sideways.
- The handle joint should carry a brass bushing, not bare metal grinding against bare metal.
South African high-traffic areas expose weak welds quickly. A wobbly head telegraphs failure before the gap closes. The right laminate floor gap fixer tool endures repeated, forceful cranks without losing its bite.
Step-by-Step Gap Repair with a Pull Bar
Clearing the Seam and Inspecting Debris
The most overlooked step happens before the pull bar moves. Before the laminate floor gap fixer tool touches the boards, clear the seam. No laminate floor gap fixer tool will overcome a contaminated seam. I use a vacuum attachment and a plastic scraper to lift every fragment of underlayment or dust. Debris settles in the locking profile’s lower lip. Failing to remove it means the pull bar presses the boards together on a false surface, and the gap reappears within days.
Inspect the seam under a bright light. Look for chipped tongues, raised edges, or adhesive remnants. A damaged locking mechanism cannot be forced shut. The pull bar should engage the board’s edge at a low angle, hooking the groove without scraping. Work in short increments.
Slide the pull bar’s lip under the board edge. Tap the shoulder with a mallet. Check the seam every few taps for equal closure.
Positioning the Tool on the Plank Edge
Positioning the pull bar is a negotiation. Slide the laminate floor gap fixer tool under the plank edge until the lip catches the lower groove. That click means the hook is seated. Aim the handle toward the wall. Tilt the bar to a 10 degree angle. This keeps force parallel to the floor. Tap once, then tap again.
Rhythm matters. Three gentle taps beat one angry swing. Run a fingernail along the seam after each tap. A ridge means you stopped short. Reposition the bar. Twisting your wrist risks snapping the tongue. Shift, do not force.
Here is your positioning checklist:
– Confirm the lip is fully hooked.
– Keep the handle level.
– Tap in small intervals.
– Check the seam every third hit.
That is the whole game. The laminate floor gap fixer tool works only if you let it. Slow down. The gap will close.
Applying Controlled Pulling Pressure
The difference between a seamless floor and a mediocre one is measured in newtons, not brute force. When you operate a laminate floor gap fixer tool, the handle transmits every change in tension directly to your hand. Pull with steady pressure, not a jerk. A sudden yank transfers stress to the locking profile, which is how tongues snap.
- Hook the bar, then pull until you feel resistance.
- Hold that tension for a moment before tapping.
- Release slowly and check the seam.
Controlled pulling pressure means the laminate floor gap fixer tool does the work while your hand stays calm. Each pull should draw the plank a fraction of a millimetre. If you hear a creak, stop. That is the board telling you it is not seated. Reposition and start again. You are not wrestling a stubborn plank; you are negotiating a mechanical joint that responds to patience.
Seating the Locking System Fully
The gap is gone. Or is it? A visually closed seam can still hide a locking profile that never fully engaged. That is where the real repair happens. Use the correct tool and work through the seating process methodically.
- Hook the pull bar onto the plank edge.
- Pull until you hear a click.
- Release and sweep your fingertip along the seam.
- Press down on the plank with your thumb to confirm stability.
If your fingertip catches, the tongue has not slipped under the groove. Repeat the process from the start! The laminate floor gap fixer tool should seat the locking system fully on the second or third attempt. When the seam passes the fingertip test, the joint is locked. The floor will carry weight without complaint and gaps will stop reappearing after every footstep.
Checking for Spring-Back and Chips
A pulled seam can snap open the moment you release pressure. That is spring-back. It means the locking profile holds tension but never fully seated. The laminate floor gap fixer tool works only when you check for this reaction.
Release the bar slowly. Watch the seam. If either edge rises even slightly, the joint failed. Pull again, but this time keep steady pressure for a few seconds before letting go. Then inspect the plank edge for chips. A fractured tongue will not stay locked. Fresh white flecks in the seam area signal damage.
The inspection itself is quick:
- Close the seam with the pull bar.
- Hold steady pressure for three seconds.
- Release gradually and watch for movement.
- Run a fingertip across the joint.
- Inspect both edges for chipped material.
A seam that remains flush and clean after release is the result that matters.
Alternative Fixes and Preventative Measures
When Wood Filler Beats a Mechanical Tool
Some gaps refuse to close. When the locking mechanism has fully seated but a hairline opening remains, a laminate floor gap fixer tool will not improve the fit. Wood filler takes over. It fills the void without stressing the plank or risking a cracked tongue.
Reach matters. A pull bar cannot fit behind a doorjamb or inside a tight corner. Filler reaches where no lever can. Use filler only on cosmetic gaps, never on structural ones. If planks move underfoot, a laminate floor gap fixer tool is still the right call. For a static seam, filler holds up well.
Filler suits these situations:
– Gaps at the end of a row, where leverage is limited
– Hairline seams near doorjambs or fixed cabinetry
– Small openings in low-traffic areas
Prevention outranks repair. Properly aligned planks stay locked. Check the fit before locking each row and you will not need filler at all.
Stabilizing Indoor Humidity Levels
South African homes face a peculiar climate puzzle. Johannesburg’s winter air is dry. Durban’s coastal atmosphere saturates every room. These swings cause laminate planks to expand and contract, opening gaps between boards. A laminate floor gap fixer tool can pull a plank back into alignment, but it cannot change the air around it.
The humidity ranges across this country are dramatic:
- Highveld: bone-dry winters, humid summers
- Coastal KwaZulu-Natal: persistent marine moisture
- Western Cape: wet winters with damp southeasterly winds
Stabilizing indoor humidity at a consistent level prevents the movements that create gaps. When the air stays steady, planks stay put. The laminate floor gap fixer tool rests in the toolbox, waiting for a problem that never arrives.
Replacing Damaged Planks Entirely
When gaps come from a broken locking edge or water damage, no tool will save it. A laminate floor gap fixer tool can only pull boards together when the edges still bite. I have seen homeowners waste hours trying to close a seam that hides a fractured tongue. Replacement is the cleaner path.
The process demands patience. Pry the damaged plank out without wrecking your neighbours. Cut it into slats with a circular saw. Pull each piece free. Scrape away adhesive and debris. Click the replacement into place, working from the groove side. You might need a laminate floor gap fixer tool to persuade the final joint home, but only after the plank sits level.
Prevention matters more. Keep surplus planks in the room for a week before installing. Check the vapour barrier under high-moisture slabs. A silicone bead along the skirting blocks movement before it becomes a gap.
Knowing When to Call a Professional
For hairline seams, a colour matched acrylic caulk beats a laminate floor gap fixer tool when the locking edges have lost their bite. The caulk flexes with the board and keeps out moisture. I have saved a few floors this way, but only where the gap is less than two millimetres.
Prevention relies on a flat subfloor and a proper underlayment. In Durban’s humidity, I always test the slab’s moisture content first. If a gap reappears after one fix, examine the expansion gap along the walls. A laminate floor gap fixer tool only helps when the profile is intact; otherwise, call a professional when you see:
- Gaps in multiple rows with no visible cause
- A soft or springy feel underfoot at the seam
- Subfloor damage or mould visible under a lifted plank
That professional will refit the floor and correct the root issue, saving you from replacing the whole room!




0 Comments