
Preparing the Concrete Surface
Assessing the Concrete Condition – Inspect the concrete for cracks, moisture, and debris
Before embarking on the journey of how to laminate flooring on concrete, the first step is assessing the soil beneath your feet. Concrete surfaces, often overlooked, can hide silent threats—cracks, moisture, or debris—that jeopardize your entire project. The condition of your concrete foundation can turn a simple upgrade into a costly nightmare if not properly inspected. It’s not enough to glance; a thorough examination reveals hidden vulnerabilities that could compromise your laminate flooring’s lifespan.
Cracks, for example, may seem insignificant but can lead to uneven surfaces, causing laminate planks to warp or buckle over time. Moisture is another adversary, lurking beneath the surface, especially in South African climates where humidity can fluctuate unpredictably. Debris or dust particles can seem trivial but interfere with proper adhesion, leading to future gaps and separation. To ensure a seamless installation, carefully inspect your concrete and consider implementing moisture tests and crack repairs. Only then can you confidently proceed with your project, knowing the foundation is stable and ready for the laminate flooring.
Cleaning and Repairing the Surface – Thoroughly clean the area and fix any imperfections
In the shadowed corners of any renovation, the true foundation often remains unseen—yet it bears the weight of dreams and decisions. When learning how to laminate flooring on concrete, every detail beneath your feet whispers secrets that can make or break your effort. A surface riddled with dust, oil stains, or uneven patches can transform a sleek, polished finish into a nightmare of buckles and gaps.
To tame this darkness, thorough cleaning is essential. Sweep away debris with a sturdy broom, then follow with a damp mop to eliminate stubborn dust particles. Once the surface gleams with cleanliness, inspect for imperfections. Cracks or holes should be filled with a high-quality concrete repair compound, ensuring an even canvas. For wider fissures, consider applying a crack filler—this step is crucial in preventing future upheavals beneath your laminate flooring. Remember, the key to mastering how to laminate flooring on concrete lies in preparing a pristine, repaired surface that promises stability and longevity.
Ensuring Moisture Levels Are Suitable – Use a moisture meter to check and address excessive moisture
Before laying down your laminate flooring on concrete, understanding the moisture content of your slab is paramount. Excess moisture can silently sabotage your project, leading to warping, buckling, and eventual failure. Using a reliable moisture meter isn’t just a step—it’s the sentinel guarding your investment. This device provides an accurate reading of the moisture levels within the concrete, revealing whether the surface is too damp for laminate installation.
Ideally, the moisture content should be below 3% for interior spaces—anything higher demands attention. If readings indicate excessive moisture, a few strategic solutions can help. Allow the concrete to breathe with proper ventilation, or consider applying a moisture barrier specifically designed for laminate flooring. Remember, when learning how to laminate flooring on concrete, addressing moisture issues upfront is crucial for ensuring durability and stability.
- Use a moisture meter to assess the slab’s moisture levels.
- If moisture exceeds recommended levels, implement a vapor barrier or moisture mitigation system.
- Ensure the concrete dries thoroughly before proceeding with the installation.
Gathering Necessary Tools and Materials
Essential Tools – Measuring tape, saw, tapping block, rubber mallet, spacers
Embarking on the journey of how to laminate flooring on concrete is an adventure that requires more than just determination—it calls for the right tools to transform a bare slab into a realm of refined beauty. Gathering essential tools is like assembling a wizard’s kit; each piece plays a vital role in conjuring a flawless finish. A measuring tape becomes your compass, guiding every cut with precision, while a saw slices through the laminate with a gentle yet firm hand. The tapping block and rubber mallet are your enchanted instruments, coaxing planks into perfect alignment without damaging their delicate surface.
To ensure each piece fits seamlessly, spacers are indispensable—they create the necessary expansion gaps that allow the flooring to breathe, preventing future upheavals. An ordered approach simplifies the complex dance of installing laminate flooring on concrete, transforming what might seem an arduous task into a harmonious symphony of craftsmanship. Remember, every tool not only fulfills a purpose but also elevates the entire process, turning a simple project into a masterpiece of meticulous artistry.
Materials Needed – Laminate flooring planks, underlayment, moisture barrier, adhesive (if required), transition strips
Preparing the right tools and materials is crucial when learning how to laminate flooring on concrete. Without them, the project can quickly turn into a frustrating experience. Start with the essential materials: high-quality laminate flooring planks, an underlayment for added comfort and soundproofing, and a moisture barrier to prevent future damage from dampness. If your concrete slab is prone to moisture, an effective moisture barrier is non-negotiable. In some cases, adhesive may be necessary to secure the planks, especially in high-traffic areas. Additionally, transition strips help create clean edges between rooms and other flooring types. Ensuring you have everything on hand streamlines the installation process and reduces delays. Remember, the right combination of materials transforms a simple task into a seamless, professional-looking finish. When you understand what’s needed, the journey of how to laminate flooring on concrete becomes much more manageable and efficient.
Preparing the Subfloor
Leveling the Concrete – Use self-leveling compounds if necessary
Getting the subfloor ready is a critical step in learning how to laminate flooring on concrete. Even minor imperfections can cause issues later on, so proper preparation is essential. If the concrete isn’t perfectly level, using a self-leveling compound can make all the difference. This compound spreads easily and fills in low spots, creating a smooth, even surface. It’s a fast, effective way to ensure your laminate flooring sits perfectly flat and prevents future buckling or shifting.
Before applying any leveling compound, make sure the surface is free of dust, debris, and any loose particles. Once cleaned, mix the self-leveling compound according to the manufacturer’s instructions. Pour it onto the concrete and use a trowel or a long-handled squeegee to spread it evenly. Allow sufficient drying time as specified, and double-check the surface’s smoothness with a straightedge. Properly leveling the concrete lays a solid foundation, making the process of how to laminate flooring on concrete smoother and more durable.
Installing a Vapor Barrier – Lay a polyethylene plastic sheet to prevent moisture transfer
Moisture lurking beneath your concrete slab can turn your flooring dreams into a soggy nightmare. That’s why installing a vapor barrier is a non-negotiable step in the art of how to laminate flooring on concrete. Think of it as a trusty armor that shields your beautiful new floor from moisture transfer—because nobody wants a war zone beneath their feet.
Lay a sturdy sheet of polyethylene plastic over the prepared concrete surface. Make sure it extends up the walls slightly for extra protection. This barrier acts as a moisture buffer, preventing dampness from seeping through and causing your laminate to swell or warp. For added peace of mind, consider overlapping seams and taping them down securely. It’s a simple, cost-effective way to add a layer of defense that keeps your flooring pristine and damage-free over time.
- Ensure the plastic sheet is smooth with no wrinkles or tears
- Overlap seams by at least 15 centimeters for a continuous shield
- Use durable tape to secure the barrier in place, especially at the edges
When it comes to mastering how to laminate flooring on concrete, a well-installed vapor barrier is the unsung hero—quietly working behind the scenes to preserve your investment and keep your floors looking flawless for years to come. Remember, moisture issues are sneaky, but with a bit of prep, you’ll keep them at bay effortlessly.
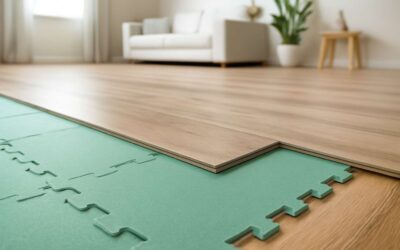
Laying the Underlayment – Place foam or cork underlayment for soundproofing and cushioning
Preparing the subfloor is a critical step that often goes unnoticed but can make or break your laminate flooring project. Once the concrete surface is clean, smooth, and properly leveled, adding an underlayment transforms the space into a sanctuary of comfort and soundproofing. Foam or cork underlayment is the secret weapon in your arsenal—cushioning your steps while muffling the noise that echoes through the room. When considering how to laminate flooring on concrete, don’t underestimate this layer’s importance; it’s the foundation of durability and comfort.
Lay the underlayment carefully, ensuring it spans the entire area without gaps or wrinkles. Overlap seams by a few centimeters and secure them with tape to create a seamless barrier. This step ensures that moisture and sound transfer are minimized, elevating your flooring from merely functional to impressively resilient. The choice between foam and cork depends on your specific needs—foam offers affordability and ease of installation, while cork provides superior soundproofing and natural insulation. Either way, this layer is your shield against future problems, making your investment in how to laminate flooring on concrete truly worthwhile.
Planning the Laminate Layout
Measuring and Marking the Room – Calculate starting point for optimal layout
Embarking on the journey of how to laminate flooring on concrete begins with a meticulous plan—one that transforms a bare slab into a stunning, durable surface. The first step involves measuring the room with precision, ensuring every plank aligns perfectly and minimizes waste. To achieve an optimal layout, consider the natural light source and the room’s shape, as these elements influence the starting point for your laminate installation.
Marking the room carefully is crucial. Use a chalk line or a straightedge to draw guidelines that serve as visual anchors for your laminate planks. This approach guarantees a professional finish and prevents surprises once the flooring is laid. For rooms with irregular shapes or obstacles, a detailed diagram can help visualize the best starting point and direction for the laminate flooring on concrete.
- Determine the room’s longest wall to set your starting line.
- Measure from that wall outward, marking the placement of the first row of planks.
- Ensure the first row is perfectly straight, as it influences all subsequent rows.
By carefully measuring and marking, you lay the groundwork for a seamless laminate flooring installation, an essential skill when learning how to laminate flooring on concrete. This step might seem simple, but it’s the cornerstone of an impeccable finish that will stand the test of time and traffic.
Deciding the Direction of Plank Installation – Determine the best direction for aesthetics and ease of installation
Choosing the direction for your laminate planks isn’t just about making the room look expansive — although that’s a bonus — it’s also a strategic move in learning how to laminate flooring on concrete. The orientation can dramatically influence the visual flow and ease of installation, especially when working directly on a slab. Typically, running planks parallel to the longest wall in the room creates a sense of space and minimizes the number of cuts needed—saving you time and a few tears of frustration.
But wait, there’s more! If you’re aiming for a modern, sleek aesthetic, consider aligning the planks with the main light source or the natural flow of the space. This subtle alignment can elevate the overall vibe of your room, making it feel more inviting and less like a DIY disaster. When deciding on the best direction, think about the room’s shape and how traffic will flow through it. For instance, in narrow corridors, running the planks lengthwise elongates the space beautifully.
- Identify the primary light source — sunlight or artificial lighting.
- Determine the longest wall or main traffic pathway.
- Align the planks to follow this natural flow for a harmonious look.
Ultimately, the goal is to marry function with style, ensuring your laminate flooring on concrete remains both stunning and practical. The right direction isn’t just a matter of aesthetics; it’s a calculated decision that makes the entire installation process smoother and more satisfying. After all, nothing says “professional” quite like a perfectly aligned, expertly laid floor that even your most critical in-laws will admire.
Considering Expansion Gaps – Plan for spacing around walls and fixed objects
In the grand symphony of transforming a bare concrete slab into a stunning masterpiece of flooring, planning for expansion gaps is the silent conductor guiding the harmony of the space. As the temperature fluctuates and humidity dances with the seasons, laminate flooring on concrete must breathe—allowing for natural expansion without buckling or warping. This delicate dance begins with visualizing the room not just as a static canvas but as a living, breathing entity.
When considering how to laminate flooring on concrete, it’s essential to account for these subtle yet vital spaces around the perimeter and around fixed objects. An unspoken rule whispers that leaving a gap of about 10 to 15 millimeters is the secret to preventing future issues. These gaps act as a buffer, accommodating the natural expansion and contraction of the material. To ensure this, use spacers during installation—they serve as your silent allies in maintaining consistent spacing, whether along walls, around door frames, or fixed fixtures.
Moreover, understanding the layout’s flow and the placement of furniture or cabinetry can influence where these gaps should be most strategic. Remember, the goal isn’t merely aesthetic; it’s about creating a resilient, enduring floor that withstands the test of time and climate. When you master the art of planning for expansion gaps, your journey of how to laminate flooring on concrete becomes not just a task but an act of craftsmanship—combining function, beauty, and foresight into one seamless opus.
Installing the Laminate Flooring
Starting the First Row – Lay the first row with spacers to maintain expansion gaps
Starting the first row of your laminate flooring on concrete can set the tone for the entire project. It’s crucial to lay the first plank perfectly straight, as any misalignment will be amplified throughout the installation. To ensure this, use spacers along the wall to maintain the necessary expansion gaps; these gaps allow the flooring to expand and contract with temperature changes.
Once the first row is in place, double-check its level and alignment. This initial step acts as the foundation for the rest of your flooring, making precision vital. If you’re working on a large area, consider snapping a chalk line to guide your placement. Remember, proper starting techniques are essential when learning how to laminate flooring on concrete, especially in ensuring a seamless and professional-looking finish.
Installing Planks – Click or glue planks as per manufacturer instructions
Once the first row of laminate flooring on concrete is securely in place, the next step is installing the remaining planks. This process demands attention to detail, as the quality of your installation depends on how well each plank fits together. Typically, laminate planks are designed with a click-lock mechanism that allows for easy and secure joining. If your flooring requires glue, follow the manufacturer’s instructions carefully to ensure proper adhesion. Proper installation not only guarantees durability but also prevents gaps and uneven surfaces that can compromise the look and longevity of your flooring.
To maintain a seamless appearance, stagger the joints of adjacent rows—this adds strength and visual interest to your floor. Use a tapping block and rubber mallet to snugly fit each plank without damaging the edges. Remember, aligning each row straight and keeping consistent gaps along the wall are vital steps in learning how to laminate flooring on concrete effectively. These small details make all the difference in achieving a professional finish that lasts for years to come.
Ensuring Proper Fit – Use tapping blocks and a mallet to ensure a tight fit
Ensuring a tight, seamless fit when installing laminate flooring on concrete is the secret to a stunning, durable finish. As you work with each plank, use a tapping block and rubber mallet to gently coax the edges into perfect alignment. This technique helps create a snug connection, preventing gaps that can diminish both the appearance and longevity of your floor. A well-fitted laminate surface not only looks polished but also resists shifting over time.
To enhance the precision of your installation, consider the following steps:
- Place spacers along the wall to maintain consistent expansion gaps.
- Align each plank carefully, ensuring the click-lock mechanism engages fully.
- Tap lightly with the mallet to settle the planks into place without damaging their edges.
Remember, patience and attention to detail during this phase are key. Achieving a flawless fit on concrete requires a delicate balance of firmness and finesse—making your laminate flooring on concrete look like a work of art that will last for years to come!
Cutting Planks to Fit – Accurately cut end pieces with a saw
Cutting laminate planks to fit precisely along the walls and around obstacles is a critical step in mastering how to laminate flooring on concrete. A clean, accurate cut ensures that each piece slots seamlessly into place, creating a smooth, professional-looking surface. Using a fine-toothed saw—such as a jigsaw or circular saw—makes this task both efficient and safe. When marking your cuts, measure carefully and double-check your lines for accuracy, especially around doorways or fixed fixtures. Remember, a well-measured cut not only enhances the aesthetic but also prevents gaps and uneven edges that can compromise durability over time.
For end pieces, it’s wise to measure the remaining space after laying full planks. Mark your measurements clearly, then cut slowly, allowing the saw to glide steadily through the material. If you’re working in tight corners or irregular spaces, consider using a coping saw or fine hacksaw for more precise control. After cutting, test-fit each piece before final installation; this ensures a snug fit and avoids unnecessary adjustments later. When you understand how to laminate flooring on concrete with precision cuts, the result is a flawless floor that stands the test of time, even in the most challenging environments.
Sometimes, you may find it helpful to use a combination of measuring, marking, and cutting tools to maximize efficiency. For example, an ordered approach—such as:
- Measuring the space carefully.
- Marking the cut line with a pencil or chalk.
- Using a straightedge or square for accuracy.
- Cutting slowly and steadily with the saw.
This methodical process ensures each plank fits perfectly, making your entire project look polished and professional. Whether you’re a seasoned DIY enthusiast or just starting, mastering these cutting techniques is essential for achieving the best results when learning how to laminate flooring on concrete in your home or business setting.
Completing the Last Rows – Trim and fit last pieces carefully
As you near the final stages of your flooring journey, the last rows demand a meticulous touch. These slender strips of laminate are the culmination of your craftsmanship—each piece must be trimmed and fitted with the precision of a master artisan. The challenge lies in accommodating irregular wall contours and obstacles, ensuring every plank aligns flawlessly with its neighbor. It’s here that patience transforms into perfection, and every cut becomes a stroke in your masterpiece.
To achieve a seamless finish, measure the remaining space with unwavering accuracy. Use a pencil or chalk to mark your cut line, then employ a straightedge or square to guarantee straight, true edges. For the final pieces, a fine-toothed saw—such as a jigsaw or a handsaw—becomes your tool of choice. Cutting slowly and steadily prevents splintering and guarantees a clean edge. Remember, a well-fitted last row enhances both the aesthetic appeal and the durability of your laminate flooring on concrete.
When fitting these last planks, consider the use of a tapping block and rubber mallet. These tools help snugly lock the planks into place without damaging the surface, especially critical in tight corners and around fixtures. If necessary, employ an ordered approach—measuring, marking, and then cutting—each step reinforcing the precision needed for a professional finish. The result? A flawlessly installed laminate flooring on concrete, ready to impress for years to come.
Finalizing the Flooring Installation
Removing Spacers – Take out spacers once installation is complete
Once the last plank finds its place and the final row is secured, it’s time to bring the installation to a close by removing the spacers. These little guardians of expansion gaps have served their purpose, ensuring each plank has room to breathe and expand naturally with temperature changes. Carefully extracting the spacers without disturbing the alignment preserves the integrity of your flawlessly laid laminate flooring on concrete.
As you gently lift each spacer, a subtle sense of completion washes over you—the space for movement is now guaranteed, but the visual continuity remains untouched. This step might seem simple, yet it’s crucial in preventing future buckling or warping. Remember, the integrity of the final look depends on meticulous spacer removal—think of it as releasing the final puzzle piece into its perfect spot. Once spacers are out, the flooring is ready for the finishing touches and the beauty of your craftsmanship can truly shine.
Installing Transition Strips – Cover expansion gaps at doorways and transitions
Once the last plank is snugly in place and the spacers have been removed, it’s time to give your flooring the grand finale: installing transition strips. These unsung heroes of flooring installation do more than just cover gaps—they provide a polished, professional look at doorways and between different flooring types. Knowing how to laminate flooring on concrete involves more than just laying planks; it’s about finishing with finesse.
Transition strips are especially vital when your laminate flooring meets other surfaces like tiles or carpet. They bridge the gap seamlessly, preventing tripping hazards and ensuring your floor remains aesthetically pleasing. To achieve a smooth transition, measure the width of the expansion gap and cut the strip to size. Secure it with nails or adhesive, depending on the manufacturer’s instructions. This step not only enhances durability but also elevates the overall visual appeal of your installation.
For best results, opt for transition strips that match the style and color of your laminate flooring. Whether you choose a sleek aluminum profile or a wood-look finish, these finishing touches complete your project beautifully. Remember, when it comes to how to laminate flooring on concrete, meticulous attention to transition details transforms a good job into a truly professional one.
Cleaning the Surface – Remove dust and debris for a pristine finish
Before the final flourish of your flooring masterpiece, a pristine surface is essential. Dust, debris, and lingering particles can undermine the sleek finish you’ve worked so hard to achieve. Meticulous cleaning transforms the space into a canvas ready to showcase your craftsmanship. In the realm of how to laminate flooring on concrete, this step is often underestimated but holds the power to elevate the entire project. A clean, debris-free surface ensures that the laminate planks sit perfectly, preventing any unevenness or future damage.
To achieve this, sweep thoroughly with a soft broom, followed by a damp cloth to pick up stubborn dirt. Pay special attention to corners and crevices where particles tend to accumulate. Once the surface is spotless, consider using a vacuum with a brush attachment for an extra level of cleanliness. This attention to detail not only improves the appearance but also prolongs the longevity of your flooring, turning a simple installation into a lasting statement of quality.
Removing all dust and debris is the final step before laying the underlayment and planks. It might seem minor, but this act is crucial—it’s the foundation upon which your beautiful laminate flooring on concrete will stand. Remember, a flawless surface today guarantees a stunning, durable floor for years to come, proving that perfection lies in the details. After all, every inch matters when creating a space that’s both functional and breathtaking!
Post-Installation Tips for Durability and Maintenance
Allowing for Settling – Let the floor settle before moving furniture
Once the last plank has been securely clicked in place, patience remains a virtue. Allowing the laminate flooring on concrete to settle is crucial for long-term durability. This period helps the materials acclimate to the environment, reducing the risk of warping or buckling down the line. Typically, a 24 to 48-hour window is recommended before moving furniture onto your newly installed floor. During this time, avoid walking on the surface excessively—let the adhesive and underlayment set fully. The goal is to give your laminate flooring on concrete a stable foundation, ensuring it remains pristine and resilient for years to come. Remember, rushing this step can compromise the integrity of your investment, leading to costly repairs later. Patience during this phase is not just wise; it’s essential for achieving a flawless finish that will stand the test of time.
When it comes to furniture placement, a gentle approach is best. Use protective pads under heavy items to prevent indentations and scratches, and gradually introduce furniture after the settlement period. This not only preserves the surface but also helps maintain the aesthetic appeal of your floor. Proper maintenance, combined with an understanding of how to laminate flooring on concrete, guarantees your space remains inviting and functional. Taking these small but significant steps ensures that your investment in laminate flooring yields a stunning, durable result that endures the hustle and bustle of everyday life.
Regular Cleaning and Care – Use recommended cleaners to maintain appearance
Maintaining the pristine allure of your laminate flooring on concrete requires more than just a meticulous installation; it demands ongoing care and attention. Once your floor has settled and the furniture graces its surface, the journey toward durability begins with regular cleaning and thoughtful maintenance. Using recommended cleaners designed specifically for laminate ensures your floor’s finish remains vibrant and unmarred, warding off the dulling effects of dust and grime.
A gentle sweeping or vacuuming daily prevents abrasive particles from scratching the surface, while occasional damp mopping with a microfiber cloth keeps the floor looking fresh. Remember, harsh chemicals can damage the delicate top layer—stick to pH-neutral cleaners to preserve the integrity of your laminate flooring on concrete. For added protection, consider implementing a routine that includes the use of felt pads under furniture legs and avoiding excessive water exposure, which can seep into seams and compromise the flooring’s stability.
To streamline your upkeep, you might find it helpful to follow this simple, natural routine:
- Clear loose debris daily.
- Use a laminate-friendly cleaner and damp mop weekly.
- Address spills immediately to prevent staining or warping.
Such diligent care not only extends the lifespan of your investment but also enhances the aesthetic appeal, ensuring your space remains inviting and resilient amidst the hustle and bustle of everyday life. Mastery in how to laminate flooring on concrete truly shines through in these small, consistent acts of maintenance—turning ordinary floors into extraordinary showcases of craftsmanship and care.
Handling Repairs and Replacements – Address damage promptly to prolong lifespan
Every journey of craftsmanship includes moments where the magic of preservation takes center stage. Once your laminate flooring on concrete has been expertly installed, the real artistry begins with handling repairs and replacements. Damage, though unwelcome, is part of the dance of daily life. Addressing issues promptly can transform a potential eyesore into a simple fix, extending the lifespan of your beautiful floor. Scratches, chips, or water marks demand immediate attention—waiting only deepens the challenge.
When damage strikes, gather essential tools such as a putty knife, replacement planks, and adhesive if necessary. Carefully remove the compromised section without disturbing the surrounding planks, then replace or repair as needed. For larger repairs, consider removing a series of planks to ensure a seamless finish. Remember, regular inspection keeps minor issues from snowballing into costly repairs, safeguarding your investment in how to laminate flooring on concrete.
In the realm of maintenance, patience and swift action are your allies. By tending to damage with care and precision, you preserve not only the integrity of your flooring but also the enchantment it brings to your space. Whether a small scratch or a more significant crack, each repair is an act of reverence for your home’s foundation—turning fleeting mishaps into opportunities for renewal and resilience.


0 Comments